Sunday, February 17, 2013
Neck Reset
How do you get the neck off? It's a question I've been asked quite a number of times. When a steel-string guitar has an excessively high action and a very low saddle it's usually time to think about re-setting the neck. People often assume that the neck of the instrument has bowed forward under string tension. It's true, there is a tremendous amount of force working on the guitar, trying to bend it. Often though, there's a more localized distortion that happens where the heel block area has tipped forward as can be seen (greatly exaggerated) in the drawing above. Students at Timeless Instruments build with an integral heel block and Spanish foot, and the geometry works quite well at spreading the forces over a larger area by coupling to the transverse brace in the upper bout. Even if one decides to use a separate neck and block, it might be a design upgrade to incorporate the foot into his or her neck block.
I'll remove a narrow wedge of material along the edge of the heel where it makes contact with the body, effectively tipping the neck backwards by about a degree.
A straightedge laid across the frets meets this dreadnaught bridge about halfway between its surface and the face of the guitar, and the action at the twelfth fret is uncomfortably high, almost 1/8" (3.1mm). It's best if the straightedge contacts the top of the bridge, leaving some room for action adjustment in the height of the saddle. This is a Canadian instrument built in the early 80's by Claude Boucher and Robert Godin. It was an inexpensive but well-crafted guitar aimed at serious students.
The heel is actually pulling away from the body as the fingerboard dips down and the neck lifts.
The first step in taking the neck off is to remove the 15th fret. There is a small airspace left in the dovetail cavity which I'll access by drilling a hole at a slight angle towards the body end of the guitar. This can be a gamble. I've worked on one other LYS instrument, and that one had a neck joint typical of Martin-style construction.
I've cut a piece of heavy poster board to protect the finish as I lay an iron directly on the fretboard extension. The metal frets transfer the heat to the board. It takes a couple of minutes to reach working temperature.
This is a thin and flexible palette knife that I've ground and filed to just the right thickness. It's a thin blade but the edges aren't sharp. I work it into the glue joint from both edges until I reach the edge of the body.
This is an inexpensive steam cleaning device I bought at a local discount store for less than $20. It comes with a flexible hose attachment. I do not encourage the reader to modify any similar device, and I will not be held responsible for any injury that may occur from trying to emulate my methods. Pressurized live steam is dangerous.
I drilled and tapped the end of the hose fixture to accept a needle used to pump up footballs and basketballs. I also added a tiny hose clamp, figuring the more support around the needle the better.
I injected steam into the dovetail cavity for about 3 minutes total, stopping once to clean up the water which condenses around the joint. The trick is to position the guitar in such a way that water won't flow into the body. I used a couple of well-padded clamps and gentle taps from a plastic mallet to separate the two halves of the joint. This was actually the tightest fitting neck I've encountered. You can see that a little fillet of spruce stuck to the fretboard. I was able to peel that off carefully and reattach it. The dirty looking area is resin which seeped out of the rosewood. I carefully scraped and sanded the surface clean.
To establish the neck angle I used strips of 120 grit sandpaper. By pulling the strip, the end away from the fretboard encounters more abrasive and more material is removed, pitching the neck back. I take five passes on each side, then test with the straightedge. This neck required 40 passes on each side.
Some yellow glue (not epoxy!) and careful clamping, and it all went back together again.There's almost always some fretwork necessary beyond replacing the one I removed, as the fingerboard extension will settle into some slightly different geometry and odd buzzes will occur. The action at the 12th fret is now more friendly, and the neck is sitting flush with the body again.
Friday, June 8, 2012
Five-Course Mandolin Part 5
Binding is fussy. In an effort to stay away from plastic I've decided to use holly, which is a very pale, rather softish wood. A single black-white purfling strip (made from black-dyed pear and maple veneers) will suffice, and it does away with the necessity of routing two separate channels.
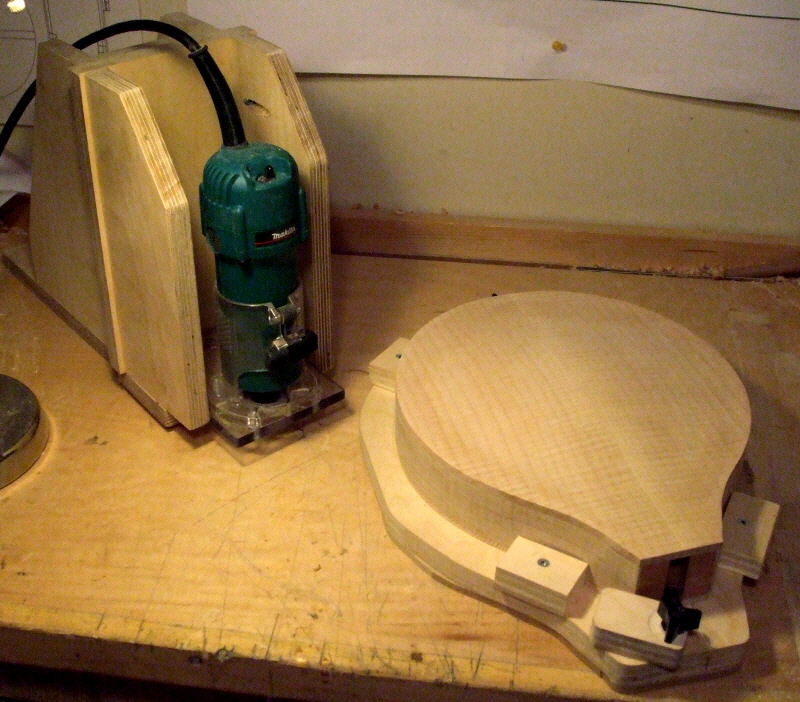
Here's my high-tech binding jig. The undulating nature of plates on a mandolin make it almost impossible to hold a router plumb to the surface. This little Makita laminate trimmer is fixed to a plywood carriage that slides up and down on two sturdy drawer slides. The device is bolted to the bench and instrument is presented to it in some form of carrier that keeps the sides perpendicular to the bench surface. I used the carving cradle with some blocks screwed down to keep things from shifting.
Here's the exciting end. A small rabbet cutting bit is surrounded by a disc of slippery plastic (a furniture glide). The router only rests on a tiny area of the top plate about 3/16" (4mm) wide and thus does not get thrown out of plumb by the rising surface of the arch. The ball-bearing guide on the bottom of the bit has been modified with the addition of clear plastic tape. I know it's ridiculous, but it lets me dial in the exact depth of cut without having to fumble through a huge and expensive stack of bearings in umpteen different diameters. Care must be taken to rout in the correct direction and I normally use a couple of light passes to reach full depth. Obviously this is an inherently dangerous operation and hands must be kept well away from the bit and all safety precautions addressed.
Ah, if they were all this simple! The gentle curve and supple binding materials make for an easy ride. I used regular masking tape to hold things in place. Having the binding channel correctly sized takes a lot of stress out of the procedure. If the binding is higher than the channel it can have a tendency to tip inward slightly, causing gaps. One has to be careful removing the tape. Sometimes slivers of grain want to come up with it.
The back gets the same treatment with the addition of a decorative line at the top. The heel cap will mate up with this and complete the curve, hopefully in a graceful manner.
Here's my high-tech binding jig. The undulating nature of plates on a mandolin make it almost impossible to hold a router plumb to the surface. This little Makita laminate trimmer is fixed to a plywood carriage that slides up and down on two sturdy drawer slides. The device is bolted to the bench and instrument is presented to it in some form of carrier that keeps the sides perpendicular to the bench surface. I used the carving cradle with some blocks screwed down to keep things from shifting.
Here's the exciting end. A small rabbet cutting bit is surrounded by a disc of slippery plastic (a furniture glide). The router only rests on a tiny area of the top plate about 3/16" (4mm) wide and thus does not get thrown out of plumb by the rising surface of the arch. The ball-bearing guide on the bottom of the bit has been modified with the addition of clear plastic tape. I know it's ridiculous, but it lets me dial in the exact depth of cut without having to fumble through a huge and expensive stack of bearings in umpteen different diameters. Care must be taken to rout in the correct direction and I normally use a couple of light passes to reach full depth. Obviously this is an inherently dangerous operation and hands must be kept well away from the bit and all safety precautions addressed.
Ah, if they were all this simple! The gentle curve and supple binding materials make for an easy ride. I used regular masking tape to hold things in place. Having the binding channel correctly sized takes a lot of stress out of the procedure. If the binding is higher than the channel it can have a tendency to tip inward slightly, causing gaps. One has to be careful removing the tape. Sometimes slivers of grain want to come up with it.
The back gets the same treatment with the addition of a decorative line at the top. The heel cap will mate up with this and complete the curve, hopefully in a graceful manner.
Thursday, April 26, 2012
Five-Course Mandolin Part 4
To refine the fit I've placed some 120 grit garnet paper in position and will sand judiciously. The movement is very small. Broad sweeping strokes will act to average out the inconsistencies in the curve rather than mate the two surfaces.
Traditionally chalk was dusted on the plate surface and the brace pressed into place. I'm using carbon paper instead. It's slightly less messy and makes reading the transferred areas easy. You can see I've carved the f-holes in a previous session I neglected to document.
Here's a high spot. It's only thousandths of an inch proud so I'll use my carving knife held perpendicular to the surface as a scraper. Soon the entire surface is grey, and a final gentle scrape leaves the surface ready for gluing.
To glue these bars down I relied on a heavy strip of cork, 1/4" (6mm) thick on the outside surface of the plate to absorb the clamping pressure from several C-clamps. Traditional violin construction sometimes involves casting a negative mold using plaster of Paris, especially if the bar is to be sprung. These braces fit perfectly and the hot hide glue pulls the pieces together as it dries.
To finish things off the ends of the braces are tapered off and feathered into the surrounding surface. The bars are trimmed to final height and rounded. You can see that the bars aren't symmetrically placed. The bass-side bar is slightly shorter. The treble bar is narrower, and is at a more acute angle to the centre-line of the plate.
Subscribe to:
Posts (Atom)